
There is only one location in the world where you can shoot:
- 14,400 Foot Glaciated Mountain Peaks
- 200 Foot Waterfalls
- 2000-Year-Old Trees
- Milky Way Reflections in Alpine Lakes
- Some of the Darkest Night Skies in the World
- ALL IN THREE DAYS!
Mount Rainier National Park in Washington State.
I live here for a reason & will take you to all my favorite photography locations.
You’ll learn complete camera techniques for landscape & night sky photography during our adventure.
Bonus – Lifetime Instant Access to 40 Hours of Video Courses ($995 value): Camera Technique, Photo Editing, Sharp Focus, Composition, Night Sky & Landscape Photography
Sign Up – Dates – Cost
Workshop schedule & information are included below this section
Workshop Dates:
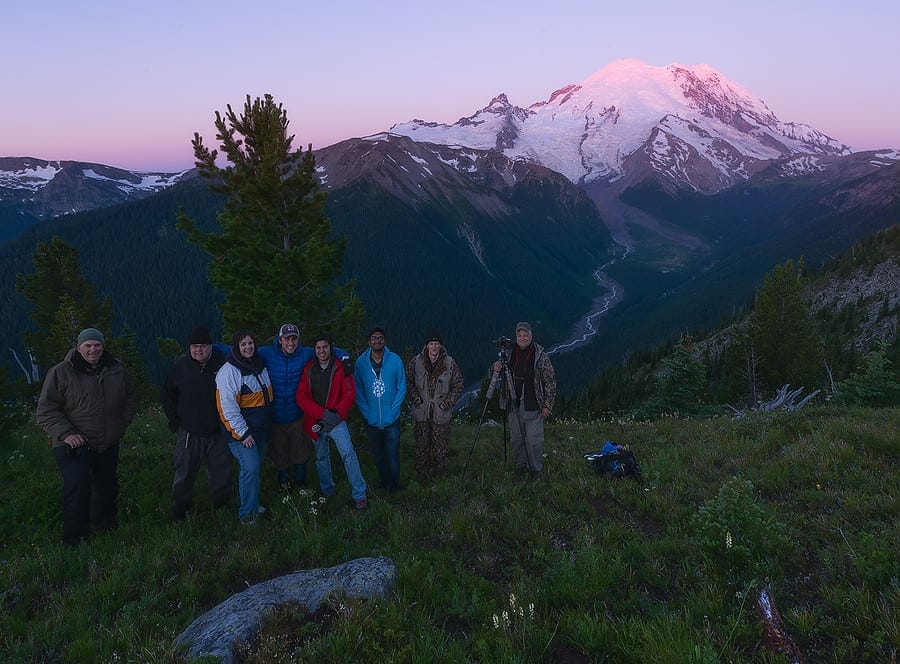
Group Size: 8 max.
Workshop Cost: $2,995 total
Skill & Fitness Level:
- Skill: Any / all. I’ll teach to your current skill.
- Fitness: 1 mile of trail hiking, on uneven terrain, with 200 feet of elevation gain, daily.
Refund & Cancellation Policy: Click Here & View
Workshop Overview & Schedule
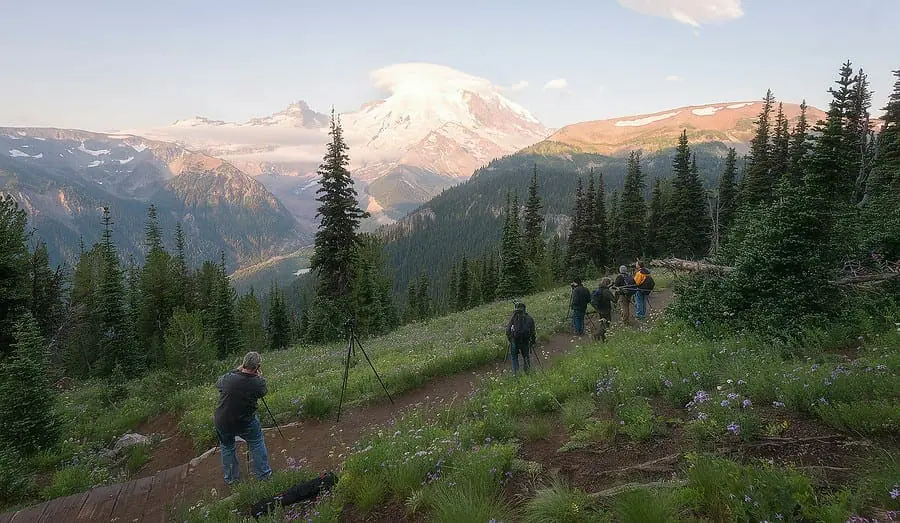
Each day of the workshop we will shoot multiple ecosystems.
I’ll teach you everything I know about the specific techniques used for each shoot.
Mount Rainier is the most glaciated peak in the lower 48.
We will shoot in the high alpine, ancient old-growth forests with massive waterfalls, and high alpine lakes with star and mountain reflections.
Visit my photo portfolio for an example of the pictures I’ll teach you to create.
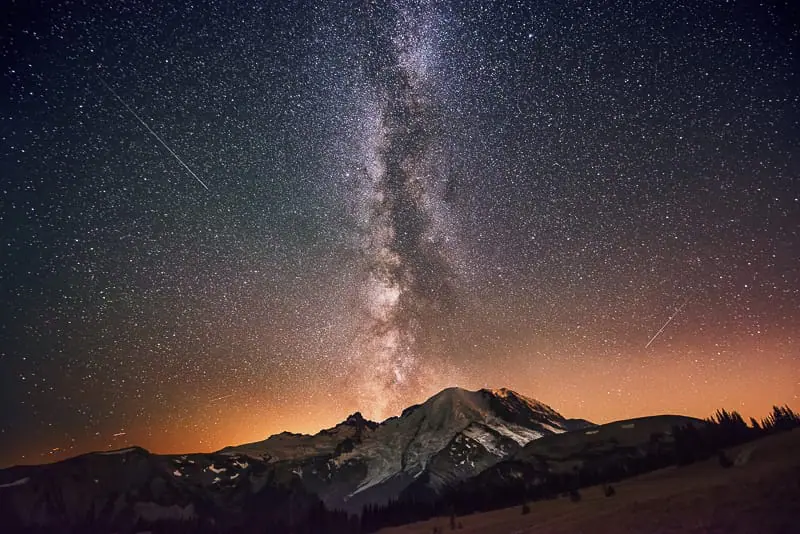
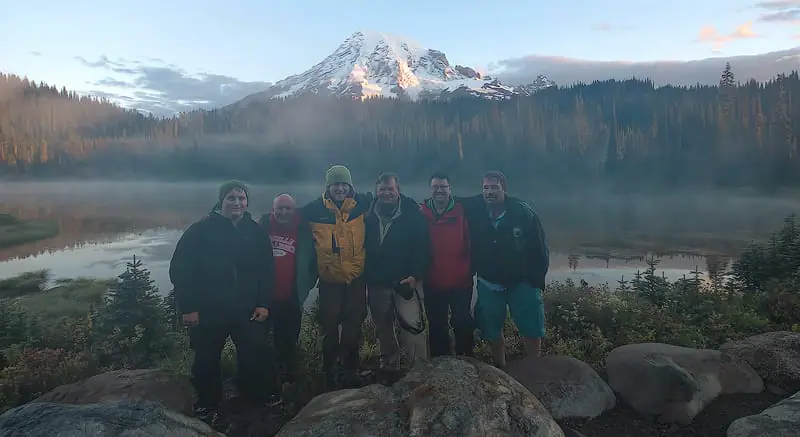
Day 1 – Sunset & Milky Way Over Mount Rainer

We start off driving up to the highest location in the park to shoot the sunset and Milky Way over Mount Rainier.
You’ll be surrounded by views of mountain ranges in all directions.
I’ll teach you all of my camera and composition techniques for shooting the sunset.
With a small group there is plenty of time for 1 on 1 instruction.
This will ensure you get great shots and understand how to capture them.
After it gets dark, the Milky Way will rise directly over Mount Rainier.
You’ll also learn my complete camera technique for Milky Way and star photography.
Day 2 – Water Falls, 2000-Year-Old Trees & Alpine Lake Milky Way Reflections
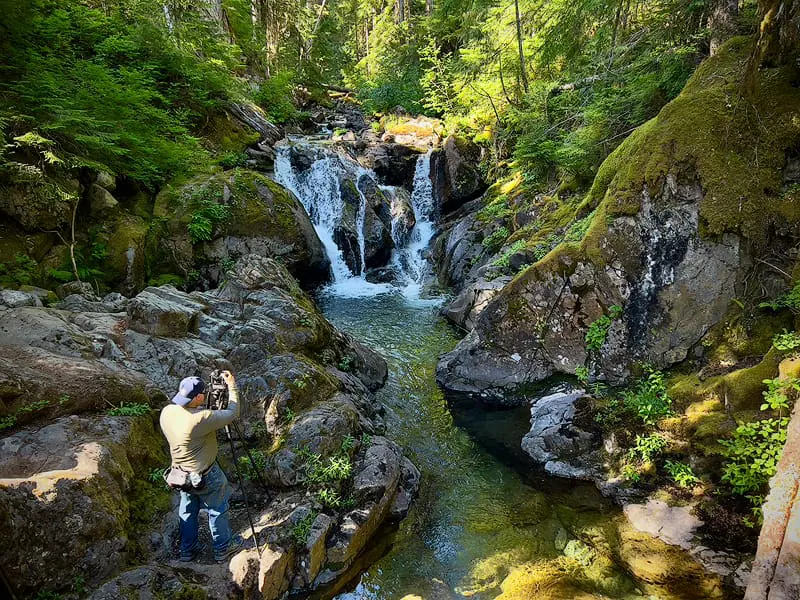
For our first shoot of the day, we will visit the biggest waterfall in the park.
It’s surrounded by massive 2000-year-old trees & temperate rainforest.
You’ll learn my camera techniques for waterfalls, long exposures, and forest photography.
Next, we drive high up into the alpine to shoot another vantage point of Mount Rainier at Sunset.
You’ll learn more about composition and camera technique, refining the skills taught on day 1.
After that, we will shoot the Milky Way reflecting in an alpine lake, high up in the mountains.
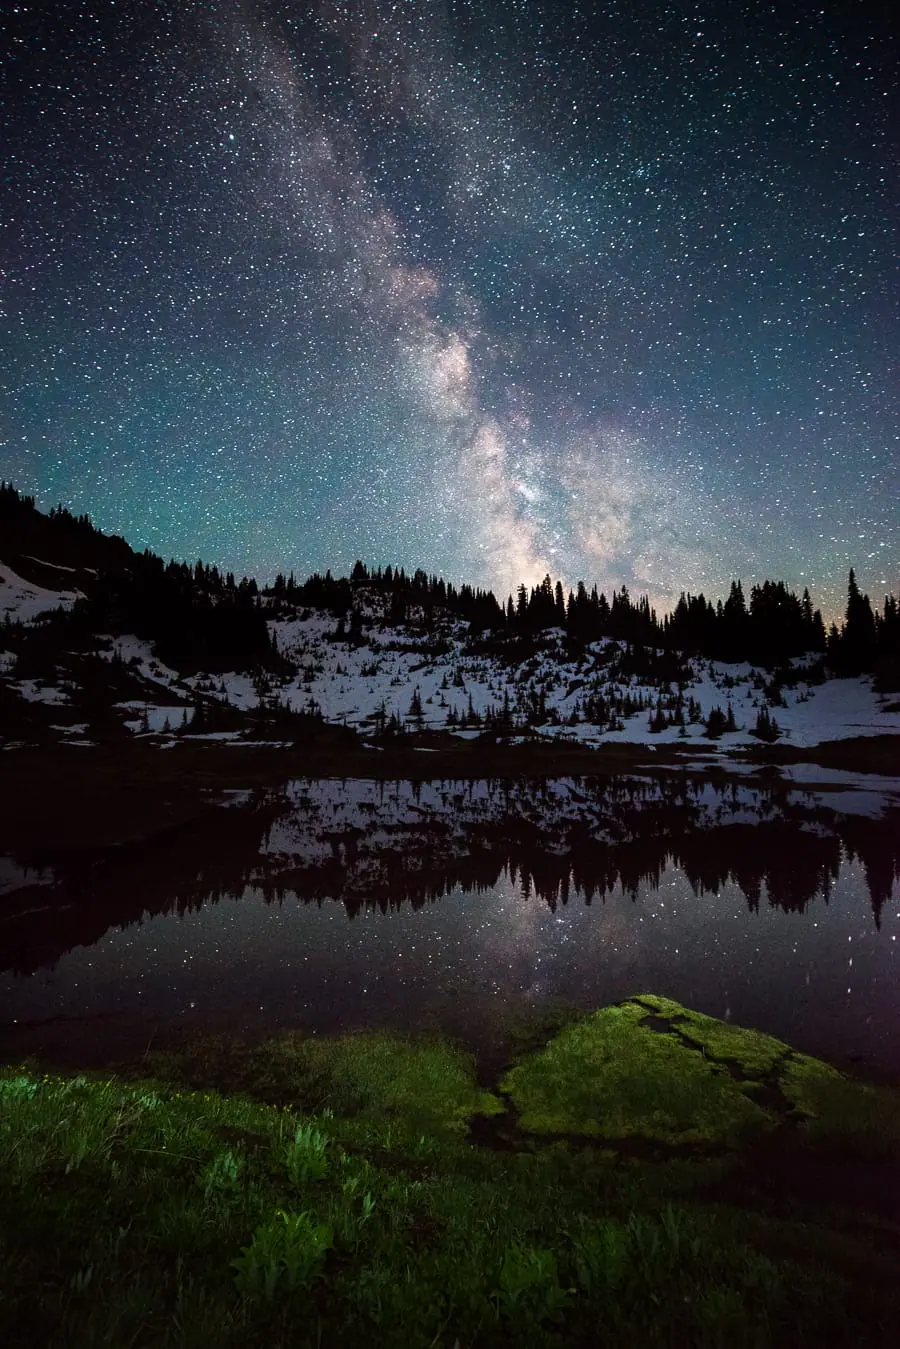
I’ll cover my camera technique skills for night sky & Milky Way Photography.
During each shoot you will get as much 1 on 1 instruction as you like.
I’ll help perfect your shooting technique and answer any other questions you may have.
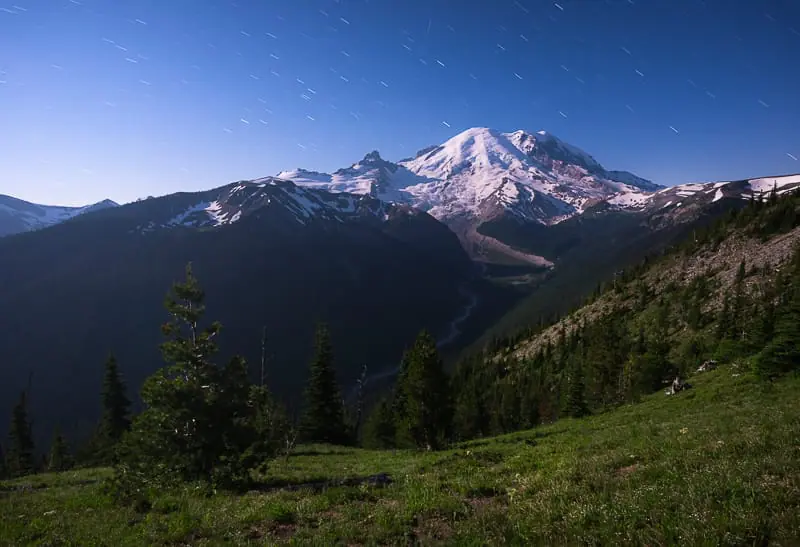
Day 3 – Sunrise at an Alpine Lake
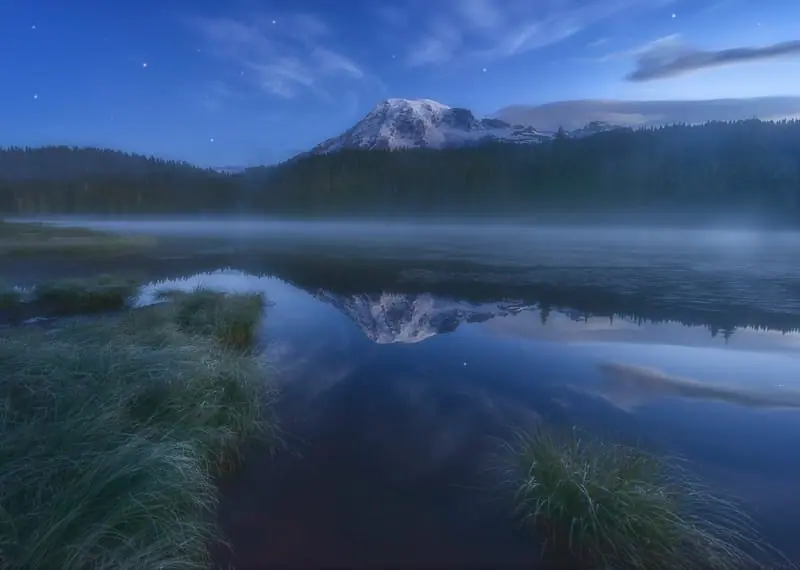
We meet early to catch the sunrise at one of my favorite locations, where Mount Rainier fully reflects in a high alpine lake.
This vantage point gives a completely different view of the mountain from the previous days.

After mastering the beginner and intermediate skills on the first two days, I’ll teach you advanced camera techniques on this last shoot.
Lifetime Access to 40 Hours of Video Courses ($995 value)
Upon registering, you will receive these products instantly via email.
Camera Technique, Photo Editing, Sharp Focus, Composition, Night Sky & Landscape Photography
Click Here & Sign Up (or Scroll Down for More Details)
What Will I Learn at the Workshop?
I work with each student 1 on 1 to ensure an in-depth understanding & high-quality images.
With 2 nights & 3 days of in-depth instruction, you will leave the workshop with great photos and a vast knowledge of landscape & night sky photography.
Visit my photo portfolio for an example of the pictures I’ll teach you to create.
Here’s what you’ll learn:
- Sharp focus techniques for landscape & night sky photography
- Composition techniques
- Camera Settings: f-stop, ISO, and shutter speed for every shooting situation
- Sunrise, sunset, and long exposures
- Twilight photography
- Mountain photography
- Forest photography
- Night sky photography
- How to predict the weather
- Effectively capturing all necessary RAW picture data in the field, to minimize post-processing at home.
- Focus Stacking, bracketing, and advanced camera technique
Whatever else you may want to learn, these workshops are anything goes… so ask away:)
Click Here & Sign Up (or Scroll Down for More Details)
Dave’s Certifications & Safety Information

I was trained as a Wilderness First Responder.
In this 80-hour course, I learned CPR, AED, Epinephrine auto-injector, plus wilderness medicine & first aid.
During all times at the workshop, I carry a first aid kit.
Dave Morrow Photography LLC holds a 2 million dollar general liability insurance policy.
Each year I spend 9 months living in the wilderness & photographing it.
You are in good hands!
What Should I Bring with Me?
Upon signing up, you will receive a detailed PDF including everything you’ll need to bring with you.
I’ve also provided this below for reference.
Camera Equipment
Pro Tip: For landscape & night photography, you don’t need much photo gear.
It’s better to become an expert at the minimum amount of gear required to take great photos.
Here’s the equipment I use for reference.
Here is what you should bring:
- Camera Backpack with tripod strap. We will be hiking 1-2 miles with gear.
- 1 DSLR or Mirrorless Camera: Full frame is preferred but any camera will work.
- 1 Wide Angle Lens: Between 8mm-24mm. Widest f-stop of f/4 or f/2.8 for night sky shooting.
- 1 Telephoto Lens: Anything in the 50-200mm range.
- 1 Tripod. Any will work but the sturdier the better.
- 2 Memory Cards: 32 GB or larger.
- 5 Batteries Fully Charged
- 1 Camera Battery Charger. Charge at your hotel every night.
- 3 Lens Cloths
- 1 Circular polarizing filter for each lens.
Clothes, Gear, and Other Items
You will be provided with a detailed checklist of everything you’ll need for the workshop upon signing up.
Here is an overview:
- Clothes for temperatures between 35 – 70 degrees Fahrenheit. Don’t get cold. It will ruin your trip! Here’s the gear I carry & how I layer it.
- 2-3 Pairs of hiking pants: The weather is very nice, sunny and warm during the summer months, but the temperature is likely to drop at night.
- 1 Pair of thermal long underwear to go under your pants
- 1-2 Long sleeve thermal shirts
- 1-2 Short sleeve active shirts
- 1 Winter jacket. It will get cold at night. Good to be prepared.
- 1 Fleece or light insulating jacket
- 1 Windbreaker jacket—Waterproof is great if you have it.
- 1-2 Pairs of boots or trail running shoes for hiking. Feet will get wet!
- 1 Winter hat/beanie.
- 1 Pair of thermal gloves
- 2-3 pairs of hiking socks
- 1 Headlamp
- 2 – 3 Sets of charged headlamp batteries
- Sunscreen
- Sunglasses
Click Here & Sign Up (or Scroll Down for More Details)
Sleeping / Lodging Arrangements
Hotel fees are not included in the cost of your admission.
You can stay at the Crestrail Lodge in Packwood, Washington, for both nights of the trip.
My students have used this hotel for over a decade. It’s a great spot.
You’re also welcome to stay at any other hotel in Packwood, Washington.
Transportation
You are responsible for your own transportation to/from and during the workshop.
Here is what I recommend:
Air Transportation
Both Seattle (SEA) and Portland (PDX) airports will provide a central location for you to fly into.
I would recommend Seattle over Portland as the drive time is slightly shorter.
Rental Car Information
For those of you who need to rent a car for the workshop, I would suggest renting a small to mid-sized sedan that holds all of your gear and does fairly well on fuel economy.
You do not need a 4WD, truck, or SUV at any time during the workshop.
Car rental services can be found near both Portland (PDX) and Seattle (SEA) airports.
Can I Bring a Friend?
If your friend brings a camera (phone doesn’t count) they must pay for workshop admission.
If they don’t bring a camera, they are welcome to tag along free of charge.
Click Here & Sign Up (or Scroll Down for More Details)
Questions?
I am always happy to help.
Contact Me: Workshops@DaveMorrowPhotography.com