COURSES & TRAINING: LOGIN

Dave Morrow Photography

|| LANDSCAPE PHOTOGRAPHY & HIKING • TRAINING & INSTRUCTION ||

  • PHOTOS
  • BLOG
  • LEARN PHOTOGRAPHY – VIDEOS & GUIDES
  • PODCAST
  • WORKSHOPS

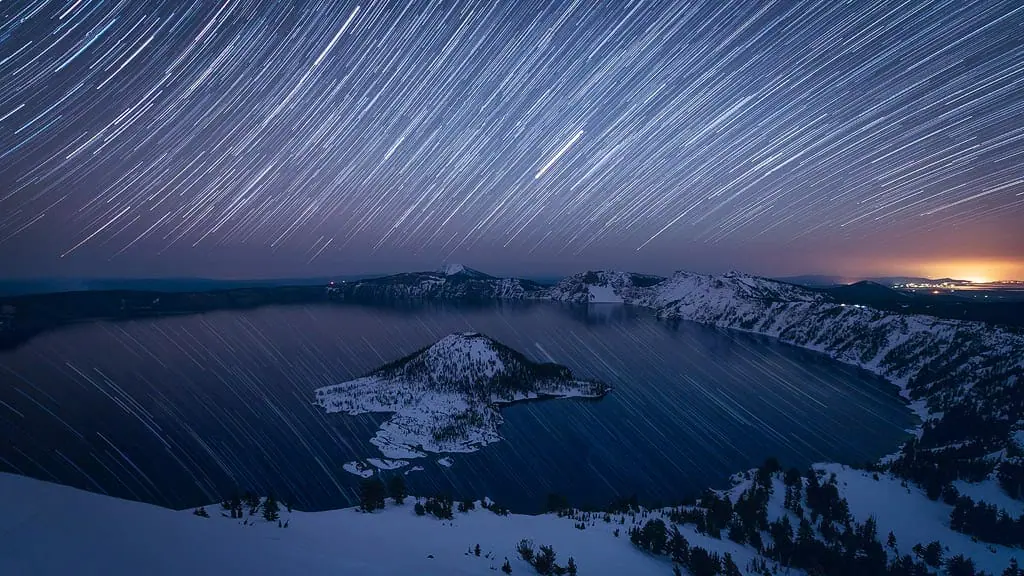
Star Trails Photo Editing Video Tutorial & Step By Step Instructions

This simple to understand, 10 minute, step-by-step tutorial and post-processing video show you exactly how to edit star trails photos from start to finish.

My Free Star Trails Shooting Tutorial teaches the best camera settings, focusing techniques, and planning tools used to capture these images.

PS: I’ve included a free night photography eBook at the bottom of this page.


[twentytwenty] photo editing, lightroom tutorials, photoshop tutorials, photography tips, photography post processing
photo editing, lightroom tutorials, photoshop tutorials, photography tips, photography post processing
[/twentytwenty]
Watch Me Edit this Exact Image Below

How to Create Star Trails – Step By Step Workflow

Steps Shown in the Video Below

I consider Lightroom and Photoshop to be best star trails software / programs. With this photo editing software you can quickly edit any star trails image, with a few simple steps, as follows:

Editing Star Trails Photos in Lightroom

Step 1: Load all images into a RAW photo processor of your choice such as Lightroom or Adobe Camera RAW.

Step 2: Adjust a single exposure out of the series to get the white balance, darks, lights and all of the other settings to mimic what you would like to see in your final image.

Step 3: Sync all of your other images from the shoot to match this image. This is very easy using the “Sync” option in Lightroom, shown in the video.

Step 4: Export all of your files to JPEG, TIFF or whatever other format you like.

Photography Tip: If you choose TIFF and plan to export a few hundred picture files you either need a really fast computer with lots of RAM.


Stacking & Editing Star Trails in Photoshop

Step 5: Layer all of the files on top of each other in Photoshop as layers. I like to use Adobe Bridge to do this using the “Load Files into Photoshop as Layers” function.

Step 6: Select all of the picture layers in Photoshop EXCEPT the bottom one. With the noted layers / photos selected, Change blend mode to Lighten.

Step 7: You should now see a picture that mimics one long star trail for each star location.  I go on to do many different other adjustments to this image after completing the steps above, but that’s for another tutorial.

Step 8: Apply noise reduction as needed, using my Simple, Powerful Noise Reduction for Star, Milky Way & Night Photography Video Tutorial.


Video – Editing Star Trails in Lightroom & Photoshop


More Night Photography Tutorials

Milky Way & Star Photography Tutorial

Northern Lights Photography Tutorial

Learn Photography Page – All Tutorials

About Dave Morrow

  • About Dave Morrow
  • Ideas Blog
  • Favorite Books List
  • Photography Gear
  • Hiking & Backpacking Gear


Star & Night Sky Photography Guides

  • Milky Way & Star Photography Guide
  • Star Trails Photography Guide
  • Northern Lights Photography Guide
  • Recommended Cameras & Lenses for Night Photography
  • eBook – Photograph the Night Sky

Camera Technique & Shooting Guides

  • Sharp Focus Photography Guide
  • Shutter Speed Photography Guide
  • F-Stop & Depth of Field Photo Guide
  • ISO Photography Guide
  • Exposure Triangle Photography Guide
  • Camera Sensor Size & Image Quality Guide
  • Color Theory Photo Guide


Copyright © 2009–2025 Dave Morrow Photography LLC, All Rights Reserved | Contact | Terms of Service | Privacy Policy